I’m willing to bet you didn’t start your blog with the thought, “Gee, I hope no one ever sees the amazing content I am creating!” In fact, you probably assumed just hitting that “Pin it” button would immediately make your pins would go viral — readers were going to come flocking to your blog and the money would start rolling in.
Sound familiar?
The hard truth is driving traffic to your blog is tough — and that’s where these Pinterest tips come into play.
If you want to go viral on Pinterest and start driving traffic to your blog, here are the 10 Pinterest strategies that got this blog to 100k pageviews and $2,000 per month $3,000 a month.
Even better?
Most of these tips are FREE (we like free, don’t we?)
This post may contain affiliate links for your convenience. That means that if you make a purchase, I will receive a small commission at no extra cost to you. Read more here.
Pinterest tips and why it helps to go viral
What the heck does “go viral” mean anyway?
As it turns out, the term “viral” is rather subjective.
When big-name bloggers go viral on Pinterest they can expect to see thousands upon tens of thousands of saves and repins.
Newer bloggers just starting out might receive a few dozen repins on a pin. When something finally goes viral for them, it might be a few hundred repins or even a few thousand.
You will know when something is starting to go viral because you will be able to see repeated pinning activity in your Pinterest activity feed on a single image (more on that later).
Unlike other platforms (side-eyeing you, Twitter and Instagram) a viral pin on Pinterest is the gift that keeps on giving — the more repins it receives the more its reaches spreads, like branches on a tree, growing and spreading even more over time.
Each time a pinner pins one of your images there is a chance that all their followers will see it. If any of their followers repin, all of their followers may see, and that is how a pin goes viral.
Just like investing in the stock market, a viral pin will get even better year after year through the magic of compound interest.
Not only that but because social media and organic searches have become so interwoven, having a pin go viral can actually help boost your organic traffic as well!
FYI: When you have a pin go viral, you may notice that the post starts to climb the Google ranks faster than usual — that’s probably one of the reasons a blog like mine can beat other sites with higher domain authority scores of 80-90 (mine is 30).
While not even pro bloggers can guarantee a viral pin every time, these ten Pinterest strategies will help tip the odds in your favor on and off Pinterest.
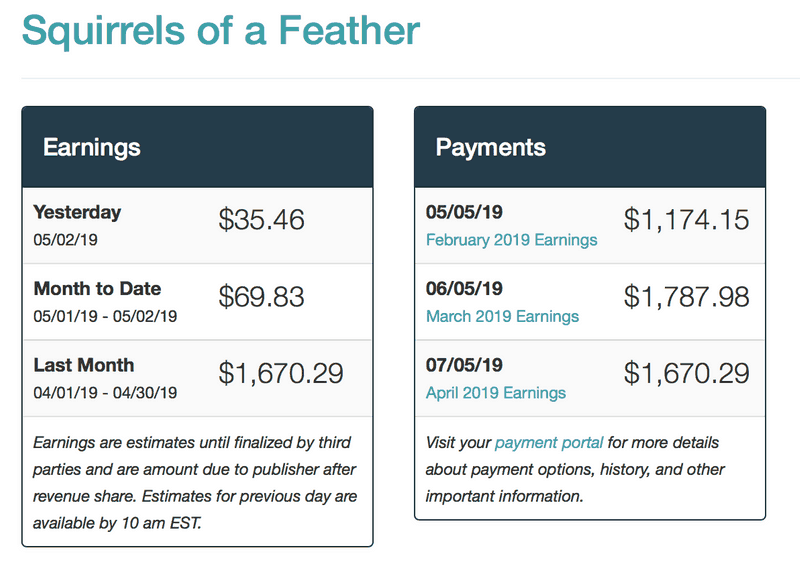
Here you can see how my ad income alone has grown over time as I have mastered Pinterest — and this is just the ad income from MediaVine!
*I also make money through affiliate marketing and sponsored posts, adding up to $3,000 a month
Making money on Pinterest with zero experience
Want to make money on Pinterest?
Then I have good news and bad news for you.
First, the good news: it is definitely possible to make money on Pinterest, even if you are starting from absolute zero!
When first started my blog, I had:
- Zero blogging experience
- Less than 10 followers on Pinterest (mostly family/friends)
- A tight budget
Now the bad news — it is NOT EASY to make money blogging, using Pinterest or otherwise!
The truth is, there is a steep learning curve when it comes to using Pinterest to drive traffic to your blog.
How to get to 100,000 pageviews
Let’s be clear — I made a LOT of mistakes when I first started blogging!
Granted, I was able to hit 140,000 pageviews in my 8th-month with viral content, but looking back there is a lot that I would do differently.
While I currently make around $3,000 per month blogging it took a lot to get to this point — and the hard part is knowing that if I had just believed in myself and been more focused, thoughtful, and strategic I probably would be making double right now!
That’s why I want to share this list of my BEST Pinterest tips with you — because I have been there, riding the struggle bus, just like you.
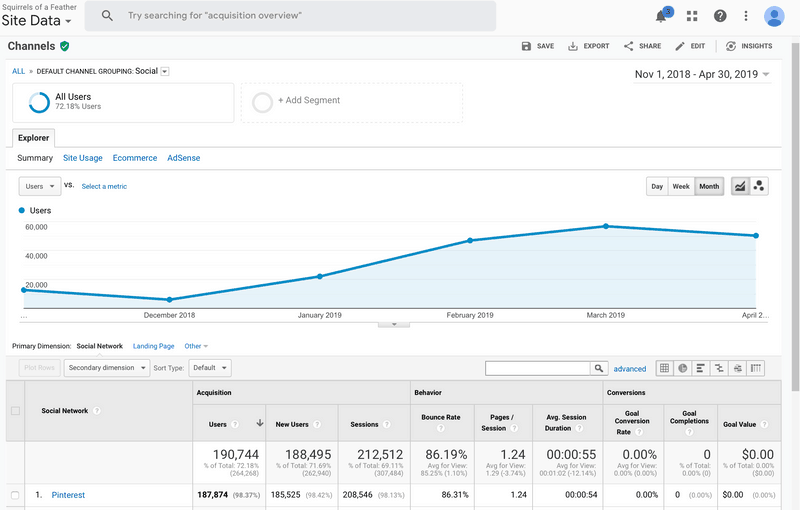
Below you can see a graph of the increase in Pinterest traffic for my blog since I started implementing these strategies in December.
Please note this traffic represents Pinterest ONLY.
I also get pageviews from organic searches, Instagram, Facebook, email, and direct traffic (those who enter my blog URL to come directly).
How to go viral on Pinterest: 10 easy tips
Without further ado, here are the top 10 Pinterest tips that will increase your chances of going viral on Pinterest and getting more traffic.
#1: Set up a Pinterest business account with rich pins
If one of your goals is to start making money from your blog, you need to treat it like a real business.
A Pinterest business account will not only drive traffic to your blog but also gives you access to advanced analytics that you can use to track data and plan strategic content.
Luckily, Pinterest makes this easy by giving you all the tools you need to convert your personal account to a business account (you can convert your account to a business account by clicking here.)
When you convert to a business account, you want to make sure that you apply to have Rich Pins.
Rich Pins make your Pinterest account will look more “official” and will give viewers scrolling through additional information that non-rich pins will not.
Enabling Rich Pins is simple with the Yoast Plug-in; if you don’t have it GET IT — you need it for SEO anyway.
After you have it, head here to validate your blog to update to Rich Pins.
NOTE: DO NOT FREAK OUT if you don’t see Rich Pins right away on your account. Pinterest is a slow-moving leviathan and it takes a while to roll-out the rich pins. My pins took 2-3 days to fully convert and even then not all of them went “rich” at the same time.
#2: Curate an epic Pinterest profile
Your Pinterest profile is a reflection of you and your blog; you need to be on-brand at all times. You are no longer pinning for yourself — you are pinning for your followers.
Each time you pin, ask yourself, “Will my followers appreciate this information? Does this pin align with my brand?”
Your profile should include the following:
- Your name and/or the name of your blog
- A professional profile picture
- A link to your blog
- Keywords related to your niche in your title
- Keywords related to your niche in your description
- Optional: Link to freebie signup or landing page
My profile reads: Minimalism for Families | Meal Planning | Personal Finance Tips
Using keywords in your profile name increases the chances that someone who is searching for information related to your topics will be able to find your profile.
If someone searches for “organization”, my profile has a higher likelihood of being shown in the Pinterest search box suggestions because I added these keywords related to my niche.
The narrower the niche, the better!
Please, please, PLEASE don’t try to write about too many topics! It is much more difficult to attract the right people, rank well on Google, get traffic from Pinterest, create an email list, rock Instagram, MAKE MONEY, and one hundred other things with too broad of a niche.
This is probably the number one biggest mistake I made when I started my blog — focus on organization OR recipes OR DIY OR personal finance and make that your thing. Seriously.
My profile description reads:
Declutter your home & save money with a minimalist lifestyle! Be happier & find financial freedom via simple living, meal planning, budgeting, & frugal living.
You can use your Pinterest profile to direct people to either sign up for your email list or drive sales to a product page right there in your Pinterest profile.
#3: Create the perfect Pinterest boards
If your niche is home decor, you may lose potential followers if your top board is about horses.
People like order and they want to know what to expect from you.
They don’t want to be looking at tasteful decor and suddenly see a random pin for “Your Horse’s Mane Can Look Like Giselle Bündchen’s Hair If You Do THIS” — I totally made that up on the fly, but it sounds legit, doesn’t it?)
Naming Pinterest boards:
For each topic, you have on your blog have one “main” board and then 5-7 sub-boards.
If you blog about home decor you might have the following boards:
- Home Decor (main)
- Home Decor on a Budget (sub-board)
- DIY Home Decor (sub-board)
- Home Decor Ideas (sub-board)
- Farmhouse Decor (sub-board)
- Modern Decor (sub-board)
- And so on…
When it comes to naming your boards, don’t try to get cutesy; “Home Decor” is more searchable than “All the Pretty Things”.
Describing your Pinterest boards:
When you create a Pinterest board immediately describe what the board is going to be about.
You want to use keywords in the description that will match and be related to the images you will be pinning to that board (remember, no horses in home decor).
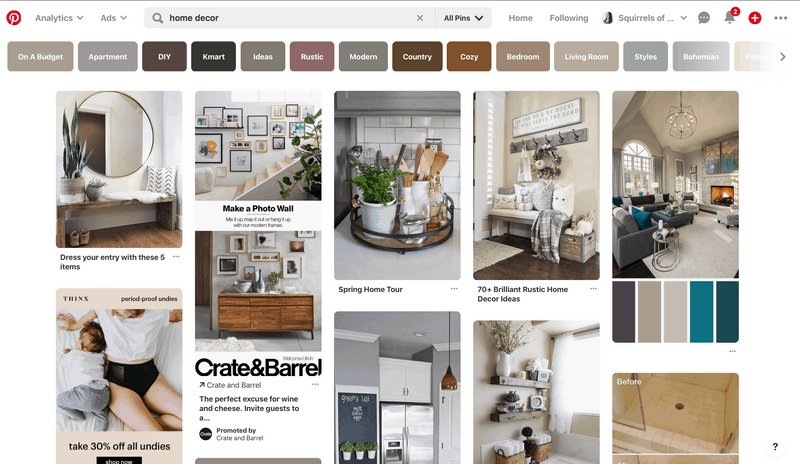
If you aren’t sure what keywords you need you can use the Pinterest search box itself to guide you; go and enter your chosen keyword (for example, home decor) in the top and run a search.
Then, take note of all the keywords that appear as optional buttons for additional searches under the search box! This little trick can also help you name your Pinterest boards.
Home decor keywords (seen as colored buttons in the Pinterest search window):
- On a budget
- Apartment
- DIY
- Kmart
- Ideas
- Rustic
- Modern
- Etc…
How to organize your Pinterest boards:
If you want to keep things neat and tidy and get your Pinterest boards organized I suggest dragging and dropping your boards in an order that makes sense, especially if you have multiple topics.
I group my own boards by:
- Organization & Cleaning
- Making Money & Side Hustles
- Recipes
- Crafts & DIY
- Etc
Although not necessary, you can also rotate your boards by season and holiday (for example, before Father’s Day rotate your “Father’s Day Gifts” board to near the top if you are hoping to sell some gift ideas.)
Place any group boards at the bottom (more on those later).
#4: Teach Pinterest what that board is about
When you create a Pinterest board, you need to teach Pinterest what that board is about.
After creating a Pinterest board with the perfect name and a well-keyworded description immediately pin relevant and well-keyworded images to that board.
Pinterest makes this easy by giving you the More Ideas button on your board; simply click that button and pin the top images to the board — I usually pin around 15-20 when starting a new board.
Give Pinterest a little bit to think about it and it will start suggesting images to you for that board — pin a few more of those and then you will be ready to start adding your own images.
#5: Hack Pinterest SEO
If you want to succeed on Pinterest, you need to understand what Pinterest is — Pinterest is not social media, it is a search engine.
I have already stressed the need for niche-specific keywords above — I want to emphasize this again, keywords are the backbone Pinterest.
Keywords should appear:
- In your profile
- In your Pinterest board names
- In your Pinterest board description
- In the text overlay that you use on your pin images
- In the pin description that you set when uploading an image to WordPress
- In each images alt text
Having the right keywords in the right places will increase the possibility that YOUR ideal follower will find exactly what they are looking for when searching for your topic.
Keywords are going to get you more traffic from Pinterest (and Google, if you do everything right).
The problem with keywording for Pinterest and Google at the same time is the difference in how they read and analyze data.
When you optimize for Google, your Pinterest-optimized pins may suffer.
Visa versa, if you optimize for Pinterest, you might not rank as highly in Google’s search engine.
This is due to the way that they crawl and pull up an image’s alt text.
If you want to get more pageviews from Pinterest without losing out on that sweet, sweet Google traffic, you should look into getting Tasty Pins.
SUMMER 2020 UPDATE: Pinterest SEO has gotten even harder to master and the al
#6: Content is king
I don’t think I need to tell you this but I am going to anyway.
You need to create amazing content that makes people want to click your pins and read your post — the longer time they spend, the better!
If someone clicks on a pin and then quickly bounces, that is going to tell Pinterest that your information isn’t relevant to what your reader is searching for and/or of low quality.
That’s bad for you, bad for the reader, and bad for your bottom line, since the more time a reader spends on the page the more ad money you are going to make and the more likely they will be to click around or follow you if they like what they see — maybe even make a purchase!
It doesn’t even have to be your own pin; even other people’s images that go viral can tell you something about what your followers love!
HOT TIP: Create a Secret Board (one that is hidden from your followers) and when you notice any pin going viral, pin it to that board to try and figure out what makes it so hot! Look at the colors, the style, the font, the keywords – don’t copy the pin, but rather try and figure out what makes it so special.
#7: Create pin-worthy images
Pinterest is a visual search engine. That means that the quality and even the content of your images matters a lot.
If you have crappy, blurry images, hard-to-read text overlays, or your images don’t seem to match the post topic the keywords are communicating, the Pinterest algorithm is not going to play nice with you.
Pinterest cycles through 1 billion pins per day. Ain’t nobody got time for your bad pins, let alone Pinterest.
You need to convince Pinterest that your images are worthy of being shown to your followers and potentially others in their Smart Feed.
I use PicMonkey to create my Pinterest optimized images, it is super affordable and always exceeds my expectations (pretty much all the images you see here have been touched up in some way via PicMonkey.)
The best pin size for Pinterest
While Pinterest tells us that they prefer 600 x 900-pixel pins, longer pins have continued to perform better over time for me personally.
I create 4-6 pinnable images per post and use the following sizes:
- 1000 x 1500 px
- 600 x 900 px
- 600 x 1200 px
Obviously, you are going to get better with time as you learn what your followers are looking for and learn to use editing software.
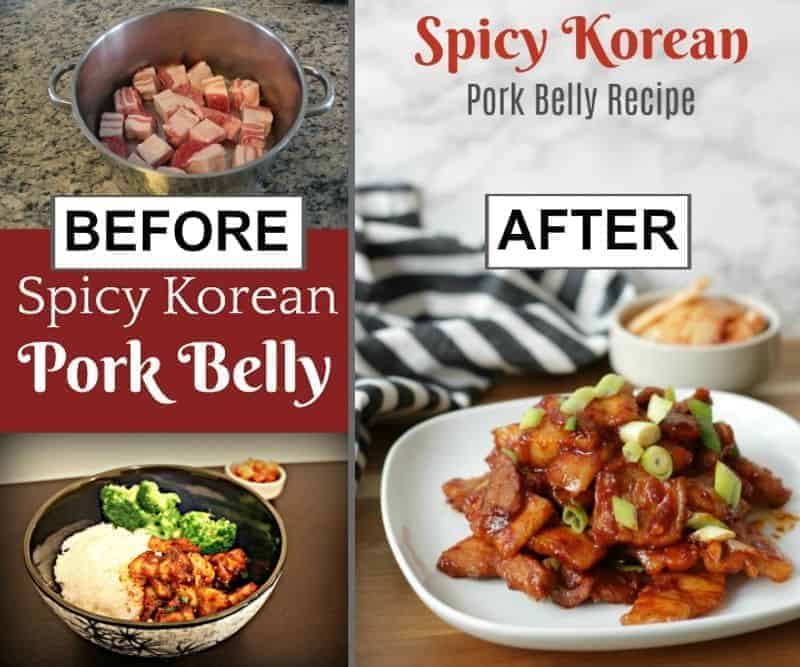
My images didn’t start out amazing; check out the progress with this before-and-after comparison for my Spicy Korean Pork Belly Recipe!
#8: How to pin on Pinterest
The rules of Pinterest are constantly in flux.
At one time it was thought that bloggers should be sharing other people’s pinnable images along with their own to play nice. I myself used to maintain a 1:2 pinning ratio (for every one pin of my own, I pinned two from other bloggers).
Pinterest recently came right out and said this is not the case; if you have enough content, there is no reason to pin other people’s images.
If your blog is very new and you don’t have enough content to rotate through on Pinterest, you can try pinning at a 1:1 ratio, sharing one other pin for every one of your own pins. Simply pin fewer images per day to spread things out evenly.
#9: The easiest way to pin on Pinterest
Spreading your pins throughout the day helps increase and even out traffic to your blog.
The problem is, most people don’t want to be anchored to their phones all day, pinning in intervals to Pinterest.
Additionally, it can be tough to manually pin if some of your best traffic hours are late at night.
For example, I get an INCREDIBLE amount of traffic from people pinning between the hours of 12-2 am (I think that is because while it is 2 am for me on the East Coast, it is only 11 pm Pacific Standard Time.)
I don’t know about you, but this mama’s brain shuts down after 8:30 pm or so — so how do I pin for the night owls?
I use Tailwind to schedule my pins!
What is Tailwind?
Tailwind is a Pinterest-approved scheduling tool that allows me to spread pin my pins throughout the day.
I literally set it and forget it.
Tailwind has all kinds of awesome features, like a “smart schedule” that tracks the times that you get the most repins and uses that to create your optimal schedule.
You also get access to Tailwind Tribes, which is kind of like a group board, but one that operates directly in Tailwind (more on group boards in a minute).
A Tailwind subscription gives you access to all sorts of advanced analytics and tracking features, so you can see how your pins are performing, which boards get the most traffic, which group boards are worth your time and which to cut, etc.
The analytical data alone is worth the investment in Tailwind; considering all the additional features, this program is a no-brainer.
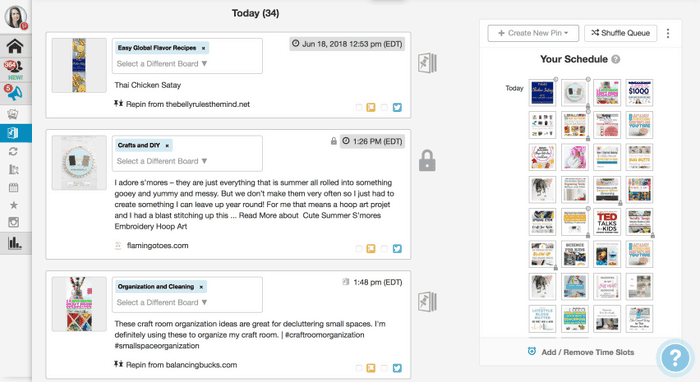
Here is what my Tailwind dashboard looks like. Observe my Smart Schedule to the right side and the individual pin snapshot to the left.
(If it seems overwhelming, don’t worry, it is really easy to figure out after some practice.)
#10: Pinterest group boards — are they worth your time?
Group boards used to be THE WAY to get more traffic as a new blogger — many of the posts you see on Pinterest with titles like, “How I Started Making $9,000 in My Third Month Blogging” list group boards as a key strategy.
Today? Not so much.
You see, Pinterest caught on to how bloggers were using (and abusing) group boards to further their own needs and devalued them.
Even boards with hundreds of thousands of followers can get you zero repins nowadays — in fact, I actually archived 90% of my group boards in late November/early December and my traffic has only gone up!
(I made the decision after analyzing Tailwind data that tracked repin rate, virality, and engagement in my group boards and saw my personal boards were outperforming group boards by far.)
However, there are some group boards that are still excellent — the problem is knowing which ones!
Follower count doesn’t seem to matter as much nowadays as much as keywording, having niche-specific content, and follower engagement.
2020 UPDATE: Group boards are basically worthless nowadays and the Pinterest algorithems are in constant flux. Instead of trying to join group boards, concentrate on your own personal boards.
If you still want to try your hand at group boards, there are are two ways to find them.
Method one is to go to Pin Groupie and check out their search engine that allows you to search for group boards by niche.
The other way is to see what group boards your niche peers and leaders participate in, and then try to join them.
It is NOT EASY to get into high-quality group boards.
Collaborators don’t want crappy pins and spammy pinners pulling down the quality of their board — you don’t set up a fantastic tea party for the Queen and then invite pigs to sit at the table.
Your best bet is to craft a nice EMAIL to the lead pinner of the group board (you will know who is the leader because they are the first person pictured in the board).
Visit their Pinterest profile and get the link to their blog. Then, find their email and send your request.
It helps if you follow them on social media and if you are sincere and polite.
Don’t feel bad if you don’t hear back.
Just send a follow-up email after two weeks if you haven’t heard anything. If you don’t hear back after that, try again when you get so amazing they can’t refuse you. 🙂
If you can’t locate an email, the second choice is to message them using the Pinterest message feature. Remain polite and sincere.
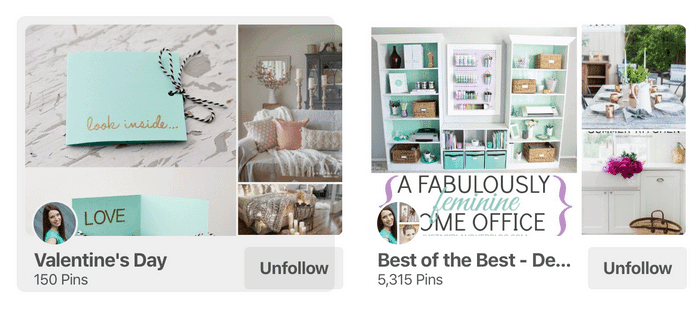
How to know if a board is a group board
You can identify group boards by searching for the little circle picture that shows the profile owner.
If you see multiple profiles in the circle, rather than just one person’s, it’s a group board.
Now go out there and create a viral post!
In conclusion, no one can guarantee you a way to get a viral pin…but if you put all these strategies into place, your chance of going viral will increase dramatically!
Please remember that Pinterest tips can only get you so far!
Pinterest is only one (small) piece of the puzzle when it comes to creating a successfully money-making blog.
If you are really serious about making money with your blog, you really need to read this post and see all the work it took me to get to $2,000 per month.
Pin this for later!
Susan says
There is so much helpful information in this post. Easy to follow and encouraging. Thanks so much for all the info.